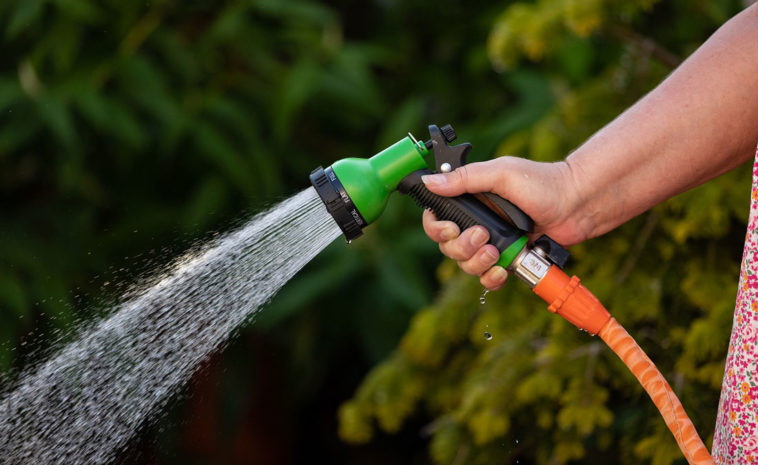
Purchasing the right equipment for your garden does not mean you are done with your garden duties. You must have the proper knowledge required to use this equipment. For example, when it comes to watering your plants, a water hose comes in handy. However, the kit comes with a wide range of technicalities too.
You have to connect your hose to a spigot first so that it supplies water. However, this can be detrimental, especially when you have no outside spigot. Even if you have an outside tap or an inside-sink or faucet to connect your hose, you need to know how to make the connection safely.
Water hose fittings and adapters will assist you in connecting your garden-hose to a water supply much easily. This blog will provide you with the proper guidance regarding the requirements and processes of connecting your garden-hose to a water source.
Tools Required For The Connection
Water supply connections are involved with many pieces of equipment. Some of the tools you will need to connect your garden-hose to a water supply include:
• Adjustable pliers
• Garden-hose adapter
• Anti-siphon valve
• Hacksaw
• Bucket
• Sandpaper
• PVC or copper tee and pipe
• PVC cement or soldering flux
• Lead-free solder
• Propane torch
• Threaded male adapter
• Plumbing tape
• Spigot
• Pipe wrench
How to Connect a Garden Hose to a Sink
Connecting your garden-hose to a sink is beneficial since you can easily direct the water anywhere in your garden. In addition, the connection will only require you to have a faucet hose adapter.
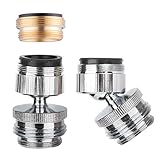
- [Hose Adapter Kit for Garden] Garden hose to faucet adapter has 55/64 inches x 27 female thread to standard 3/4-Inch male hose thread connect to garden hose or 55/64 inches x 27 male thread connect to faucet aerator. The 3/4 inches standard male hose thread allows connecting the faucet to hose aerator adapter.
- [Extra Male Adapter] We also provide an extra male adapter to connect male 15/16 inches x 27 thread to male 15/16 inches x 27 thread. Please note that if your faucet has a female thread 15/16 inch x 27 thread, we recommend you to connect female to female converter only.
- [Solid Brass Made] Multi-thread garden hose adapter connector is made of brass with chrome finish that ensure durability, and anti-corrosion.
- [360 Degree Rotating Adapter] The faucet adapter is equipped with a 360 degree swivel which avoids the hose from bending and breaking.
- [Easy to Install] The faucet adapter doesn't require any tools for installation if can be done with bare hands. The faucet adapter can be used as a garden hose attachment when you need to connect 3/4 inches hose to faucet. Only compatible with sink faucets with removable aerators.
To install the adapter, you will have to remove the aerator after turning off the water supply. Removing the aerator will require you first to block the sinks with a stopper or a rag. This will prevent the aerator parts from getting drained into the sinks.
How to Connect Garden Hose to Sink Water Source Under Cabinet
Using the pipe wrench, remove the existing water line from the source of water. The water line is mostly a threaded metal hose at the faucet’s base connected to a valved source of water. Remove the hose from the head of water but leave the faucet attachment intact.
Tighten a 3-way compression adapter securely to the source of water. After this, wound about 2 to 3 Teflon tape layers to the male thread. Use the pipe wrench to ensure that the adapter is tight. Next, apply 2 or 3 layers of Teflon tape to the male thread.
Attach the garden-hose water line on top of the adapter to face upward towards the sinks. Wound about 2 to 3 layers of the tape on the male thread and tighten using a wrench.
Attach a FIP Hose to the Compression Adapter on the remaining threading of the compression adapter. On the male thread, ensure you wound at most minuscule two Teflon tape layers. Tighten properly using a wrench.
Open the FIP hose female threading by attaching a Steel Nipple. Similarly, wound up to 3 layers of the Teflon tape on the male thread and tighten using a wrench. After this, attach a Ball Valve to the Steel Nipple and apply at least two Teflon tape layers on the steel nipple’s male thread. Tighten using a wrench.
Attach a Male Hose Adapter and wound up to three Teflon tape layers to the hose adapter’s male thread. Use a wrench to tighten. Then, Move the Ball Valve to the Off Position and Turn the Water Supply On; in case of any leaks, apply some more Teflon tape and tighten.
Attach a Pipe Wall Mount to the Ball Valve and Mount somewhere so that no weights hang on the fittings. Loose and dangling fittings are likely to deteriorate the threading, which results in leaks.
Some sinks have solid wooden panels, which are ideal for holding screws. Determine the perfect location for the shut-off valve whereby you can attach your garden-hose and turn the valve on/off at ease. Ensure to mount using the appropriate screw sizes.
Attach an Expandable Garden-Hose To the Male Threading, apply the Teflon tape, and tighten. Expandable garden-hoses are ideal because they can fit in a small bucket under the sink much more straightforward. Also, these hoses have better self-draining abilities compared to the standard garden-hoses.
Using Quick Connect Garden Hose Fittings
Quick connectors are known to connect tubes to fittings much easily. Therefore, using quick connectors is an excellent way of ensuring water-tight connections between tubing and water sources.

- [Leak-Proof Convenience] These garden hose quick connect fittings, made of high-grade brass, provide a leak-proof convenience that ensures an easy and stress-free watering experience.
- [Sturdy and Resilient] Designed to handle up to 200 PSI pressure, these water hose quick connect fittings are rust-proof and breakage-resistant, making them incredibly durable and long-lasting.
- [Effortless Connection and Disconnection] These garden hose quick connect fittings are easy to install and use, with a simple push and pull mechanism that requires minimal effort for a smooth and seamless connection and disconnection.
- [Comprehensive Set] These quick connect hose set includes 2 male brass couplers, 2 female brass nipples, and 4 rubber washers, making it suitable for various taps, sprinklers, faucets, hoses, and spigots that require male couplers and female nipples.
- [Satisfaction Guaranteed] These quick disconnect water hose fittings are backed by a 3 year warranty, ensuring premium quality and complete satisfaction with your purchase. Perfect for anyone looking for quick connect garden hose fittings or garden hose quick disconnect fittings that provide hassle-free and leak-proof convenience.
They can be used anywhere you want the water to flow. Below is how you can connect and disconnect the fittings for your garden use.
First, insert the garden-hose through the collet and O-ring into the quick connector’s body. Ensure that the hose is fully inserted into the connector. An imperfect insertion will result in leaks since the O-ring is not correctly sealed.
You can mark the end of the hose at the line of three inches. After pressing the hose and the connector together, the line should disappear to indicate a full insertion.
When the hose is appropriately inserted into the connector, the collet’s teeth will clamp it so that it does not slip out. Pulling the hose will only make the collet clamp on it harder. If you want to remove the hose, hold the collet down towards the connector to release the clamping. Then, pull the hose off the connector.
How The Quick Connectors Work
A quick-connector fitting is designed in a simple way. It comprises an O-ring, a collet, and the body. The body conceals the collet and the O-ring on both ends. The hose is inserted through the collet and the O-ring into the connector’s body.
An increase in the pressure inside the hose forces water through the collet into a groove inside the quick-connector. The collet is compressed by these grooves so that its teeth clamp on the hose. This makes it hard to remove the hose from the connector.
Pulling the hose much harder will only make the collet clamp on it tighter. With the collet holding the hose, the O-ring seals the space between the hose and the connector, making it water-tight. If you experience a leak on your quick-connector, ensure that the hose is correctly pushed inside the connector.
Are garden-hose quick connectors universal?
The quick connectors can either be universal or not. The universal quick connectors will assist you with a safe and efficient solution when interchanging the water lines.
Installing the pipe on a faucet
Wound a plumbing tape around the threads of a Male Pipe Thread faucet. Screw the pipe’s female adapter to connect the tube and the tap. Use slip-lock pliers to hold the faucet while using a wrench to turn the adapter. Ensure that the connection is tight and use the PVC cement to glue the adapter to the pipe. Using the same procedure, connect a Female Pipe Thread faucet to the pipe using a male PVC adapter.
Use a slip connection to connect the outdoor faucet to the pipe. Do this by soldering a short piece of pipe to the tap and then solder a male adapter to the tube. Wound the plumbing tape around the adapter’s threads and then screw on a female adapter of the same diameter. Use glue to connect the female adapter’s other end to the pipe.
If you want to use a compression fitting to connect the faucet to the female adapter:
1. Use glue on the adapter and the pipe.
2. Solder a male adapter to a short piece of pipe, wound a plumbing tape around the adapter’s threads, and then screw it to the PVC fitting.
3. Slide the compression nut along the pipe so that the threads face the faucet.
4. Slip a compression ring at the pipe’s end.
5. Insert the pipe into the outdoor faucet and ensure to tighten the compression nut onto the faucet’s threads.
Connect the sink-faucet to the waterline using flexible hose connectors. Glue the male adapters to the PVC water pipes” ends screwing flexible connectors to each adapter. Screw the other hose connectors’ ends to the faucet inlets.
Conclusion
There you have it! This information will certainly assist you in creating new water sources for your garden-hose. With these water sources, you will be able to water your plants both in the garden and indoors much efficiently while saving most of your time. In addition, you might also consider other of the many available ways of connecting your garden-hose to different water sources in your home.
Other Garden Hose Options

- DURABLE DESIGN - Constructed of durable polypropylene which is designed to be left outside year round without cracking.
- NO PLUMBING REQUIRED - Hooks up to your outdoor hose spigot. No need to get additional plumbing.
- WALL MOUNTED - Mounts to the wall creating an outdoor wash area where you need it. Mounting hardware not included.
- HOSE REEL AND STORAGE COMPARTMENT - Features a built in hose reel with storage compartment for gloves, gardening tools and more.
- PERFECT SIZE - Measures 21" x 17.5" x 22" tall and features 2 sliding covers which protect the sink and open to create additional workspace outdoors.